Everything Fhenix Play does, in one place
Fhenix Play is a streaming studio: compose cameras, screens, and IP feeds, polish them with on-device AI, and send the result everywhere at once — a system virtual camera, an RTMP stream, and a local recording. Control the show from an iPad or iPhone, and let your audience tip and bid with amounts that stay encrypted on-chain, powered by Fhenix CoFHE.
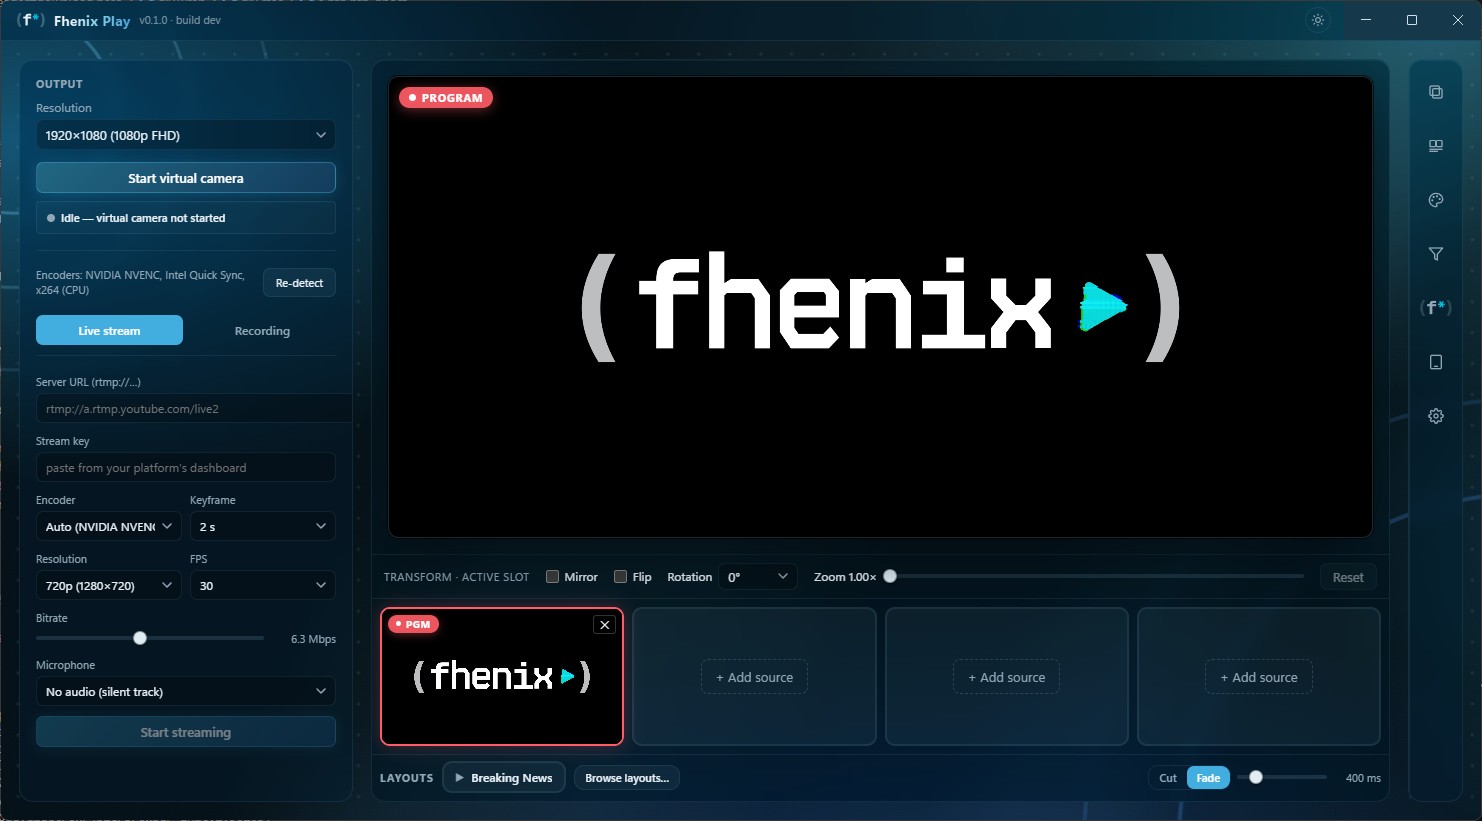
01Overview
Fhenix Play sits between your real cameras and the places your video goes. You stage up to four sources, dress the picture up (color, AI effects, overlays, full-scene layouts), and publish the finished Program as a system virtual camera called “Fhenix Play” — and, at the same time, as a live RTMP stream and a local recording.
What it does, at a glance
| Capability | What you get |
|---|---|
| Multi-source switching | Four slots for webcams, screens/windows, RTSP feeds, video files, a demo loop, or your iPad/iPhone camera. Click a tile to take it to Program with a cut or fade. |
| Layouts | Full-screen scenes written in HTML — breaking news, interview split, picture-in-picture — with live video boxes mapped to your slots. |
| Transforms & color | Per-source mirror, flip, rotate, zoom; hue/saturation/exposure/contrast/temperature grading; one-click color match to a reference camera. |
| AI filters | Background blur / replace / remove, face privacy, auto-framing, live captions, hand-gesture triggers, and a voice changer — all on-device. |
| Overlays & plugins | Text, images, web pages, and sandboxed HTML plugins — in front of you or behind you. |
| Outputs | Virtual camera for Zoom/Meet/Teams/OBS, RTMP streaming to any platform, and local MP4/MKV recording — independently, in parallel, hardware-encoded. |
| Companion app | A native iPad/iPhone app on your LAN: live Program monitor, multiview, switching, layout control, telestration with Apple Pencil, tip moderation, and the device camera as a wireless source. |
| Confidential interactions | Encrypted-bid rounds, viewer perks, and confidential super-chat tips on Fhenix CoFHE — amounts stay encrypted end to end. |
02Installation
Fhenix Play ships as a signed installer per platform — an .exe on
Windows, a .dmg on macOS. The companion app installs separately on
your iPad or iPhone.
Windows Install the app
-
Download and run the installer
Grab
Fhenix Play-0.1.0-build<N>-x64.exeand double-click it. If Windows shows a SmartScreen notice, click More info → Run anyway. -
Allow the install
Windows asks for administrator permission — the installer registers the virtual-camera driver system-wide. Click Yes.
-
Done — the camera is registered automatically
The Fhenix Play camera is immediately visible to Zoom, Meet, Teams, and OBS. Launch the app from the Start menu; Windows asks for camera/microphone access the first time you load a source.
macOS Install the app
-
Open the disk image
Download
Fhenix Play-0.1.0-build<N>-arm64.dmg, open it, and drag Fhenix Play.app to Applications. The app is signed and notarized. -
Approve the camera system extension (one time)
The first time you start the virtual camera, macOS shows “System Extension Blocked.” Click Open System Settings → Privacy & Security, allow the Fhenix Play extension, and enter your password if asked.
-
Grant camera & microphone access
Both are required: the camera to compose your picture, the microphone for on-device captions and audio in your stream/recording. Audio is never uploaded anywhere.
iPadOS / iOS Install the companion
Install Fhenix Play Companion from the App Store (or a TestFlight invite) on any iPad or iPhone running iPadOS/iOS 17 or later. Pairing and everything else the companion does is covered in §12.
System requirements
| Platform | Minimum |
|---|---|
| Windows | Windows 10 or 11 (64-bit). A modern multi-core CPU is recommended for AI filters; an NVIDIA/Intel/AMD GPU enables hardware encoding. |
| macOS | macOS 13 Ventura or later, Apple Silicon or Intel. VideoToolbox hardware encoding is used automatically. |
| iPadOS / iOS | iPadOS or iOS 17+, on the same local network as the desktop. |
03Quick start — live in five steps
Add a source
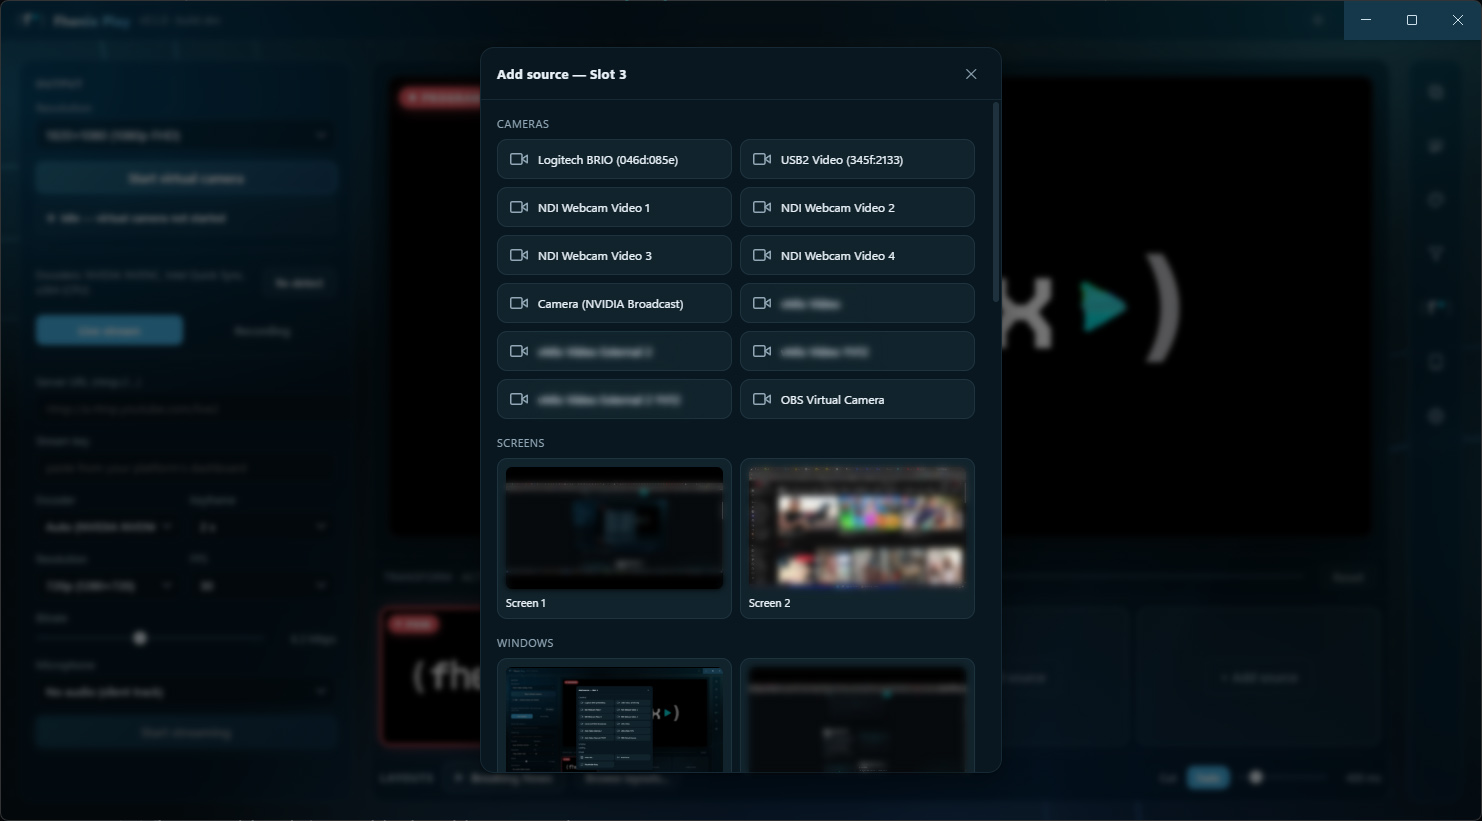
In the preview strip, click + Add source on an empty tile and pick your webcam (or a screen, an RTSP feed, a video file, or the demo loop).
Take it to Program
Click the tile. It moves to the large Program view with a red PGM badge — this is what every output sends.
Dress it up (optional)
Open the right-hand dock and try Filters → Background for a blur, add a lower-third from Overlays, or take a full scene from the Layouts strip.
Start an output
In the left Output column, click Start virtual camera — and/or set up Live stream / Recording right below it.
Select the camera in your meeting app
In Zoom/Meet/Teams, open camera settings and choose Fhenix Play. You’re on.
04The interface
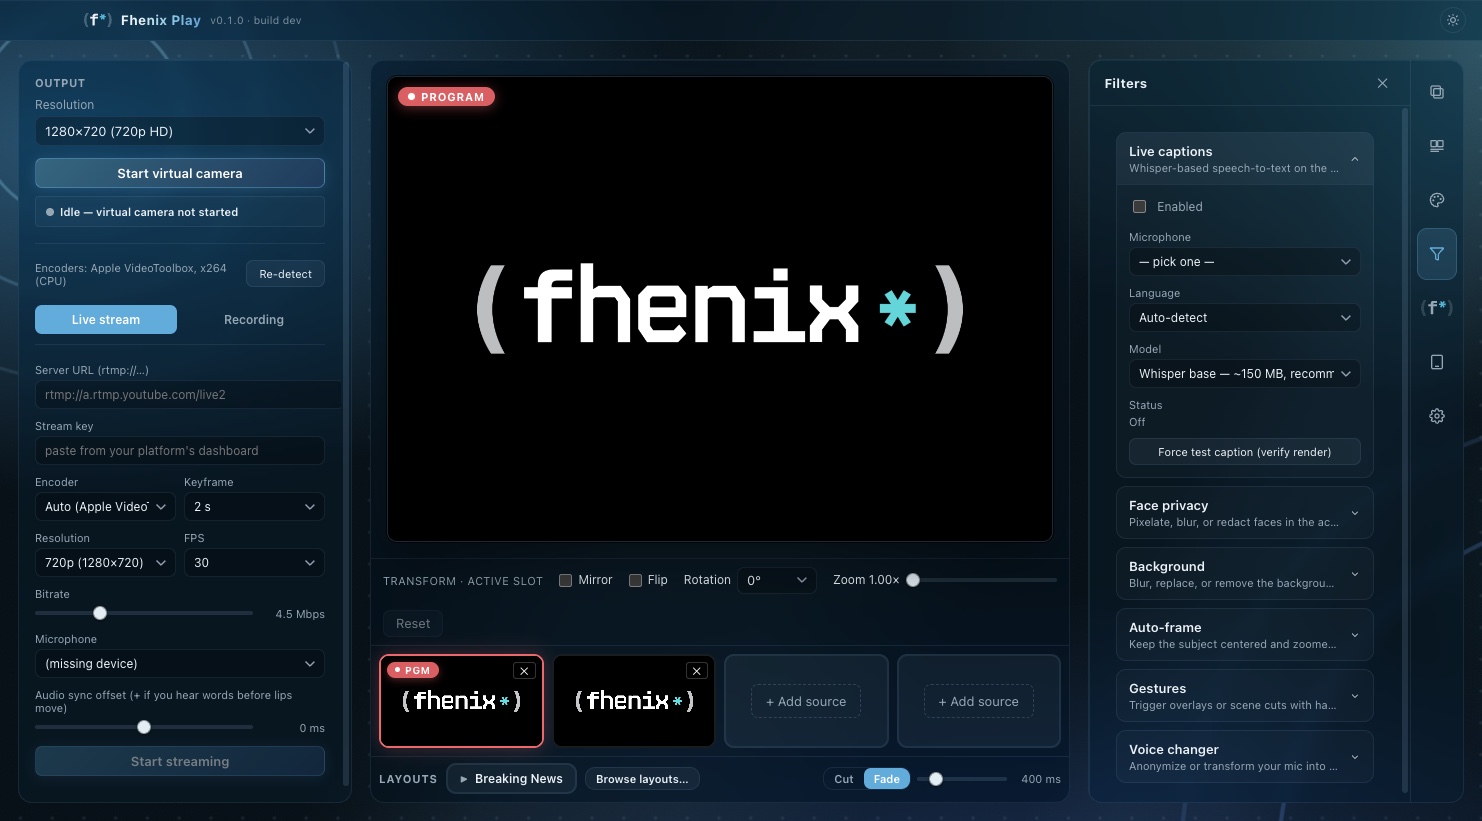
The window has three regions.
| Region | Contains |
|---|---|
| Left — Output | Output resolution picker, the virtual camera start/stop with live status, and the Live stream / Recording tabs with their encoder settings. |
| Center — Stage | The big Program view (what all outputs send), the Transform bar, the four-slot preview strip, and the Layouts strip with the take-transition control. |
| Right — Dock | An icon rail that switches panels: Overlays, Layout, Camera color, Filters, Blockchain, iPad companion, and Settings. |
05Sources & the preview strip
The preview strip holds up to four sources. The tile on Program (red border, PGM badge) is what your outputs send; click any other tile to take it with the transition you picked (cut or fade — the control lives at the right end of the Layouts strip, and applies to every take).
Source types
| Source | Notes |
|---|---|
| Webcam / capture device | Any camera the OS sees, captured at your output resolution. |
| Screen or window | Pick a display or a single window from live thumbnails. |
| RTSP feed | IP cameras and NVRs: paste an rtsp:// URL and give it a name. Runs over your network — great for wired multi-angle setups. |
| Video file | A local mp4 / webm / mov, looped. |
| Companion camera | Your iPad or iPhone camera, published wirelessly from the companion app (§12). |
| Demo loop | The built-in branded placeholder — handy for testing and as a “be right back” card. |
Per-tile controls
| Control | Effect |
|---|---|
| Click tile | Take the source to Program (cut or fade, per the take-transition control). |
| REF | Mark this source as the color-match reference (green border). Other cameras can be graded toward it in one click from the Camera color panel. |
| ✕ | Clear the source from the slot. |
Output resolution
The Resolution picker at the top of the Output column sets the canvas every output shares — from 320×240 up to 4K UHD, filtered to what your camera supports.
06Transforms
The Transform bar above the preview strip adjusts the geometry of the active source. Each source keeps its own settings.
| Control | Range | Notes |
|---|---|---|
| Mirror | on / off | Flip left↔right — the natural “selfie” view. |
| Flip | on / off | Flip top↔bottom. |
| Rotation | 0° / 90° / 180° / 270° | For sideways or mounted cameras. |
| Zoom | 1.0×–4.0× | Punch in to crop tighter. |
| Reset | — | Back to defaults. |
The preview tile mirrors your transform too, so the framing you see is the framing you send.
07Camera color
The Camera color dock panel grades the active source. Everything is neutral by default and costs nothing until you move it.
| Control | Range | Use |
|---|---|---|
| Hue | −180°…+180° | Shift overall color. |
| Saturation | 0…200% | 0 = grayscale, 100 = neutral. |
| Exposure | −3…+3 EV | Brighten or darken in stops. |
| Contrast | 50…150% | Punch or flatten. |
| Temperature | −1…+1 | Cooler (blue) ↔ warmer (red). |
08Filters & AI effects
The Filters dock panel is a stack of collapsible sections; an active filter’s section stays open so you can always see what’s running. Everything runs on-device — your video never rides a third-party cloud.
Background — blur, replace, or remove
Segments you from your room in real time.
- Blur — keep the room but soften it; a strength slider controls the amount.
- Replace — drop in a solid color behind you.
- Remove — make the background transparent so “Behind” overlays show through.
Edge softness and edge cutoff fine-tune the silhouette. The first enable has a one-time model load.
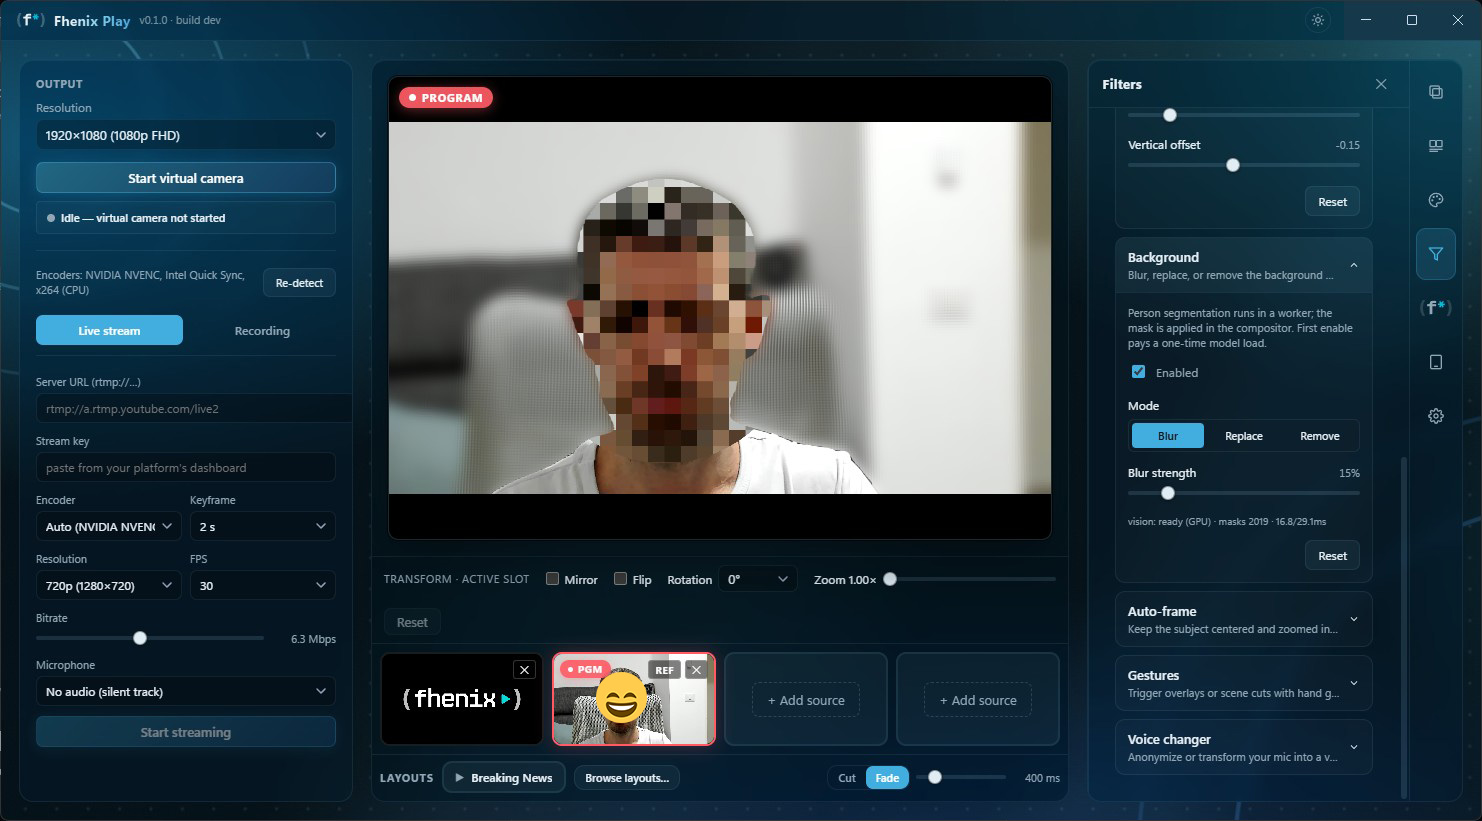
Face privacy
Obscures detected faces in three modes — Pixelate, Blur, or Redact eyes (a black bar) — with sliders for block size / strength, padding, and (for the eye bar) vertical offset. Protects bystanders and camera-shy guests without touching the rest of the frame.
Auto-frame
Tracks your face and gently pans/zooms to keep you centered. One Tightness slider goes from a wide head-and-shoulders shot to a tight face crop.
Live captions
On-device speech-to-text (Whisper) burned onto the Program output. Choose your microphone, language (auto-detect or fixed), and model size — tiny (~75 MB, fastest), base (~150 MB, recommended), or small (~500 MB, best quality). Models download on first use; a status line shows listening/transcribing state.
Gestures
Trigger actions with hand poses detected on the active source. Bind any of seven gestures — ✋ open palm, ✊ fist, 👍 thumb up, 👎 thumb down, ✌️ victory, ☝️ point up, 🤟 ILY — to actions like toggling an overlay or cutting to another source. Held gestures fire once, then cool down.
Voice changer
Transforms your microphone and exposes it as a virtual mic other apps can select. Presets: Anonymize, Deeper, Higher, and Custom (a pitch slider in semitones).
09Overlays
The Overlays dock panel stacks graphics on top of (or behind) your video. Add as many as you like; drag to reorder; toggle each with its eye icon.
Overlay types
| Type | What it is |
|---|---|
| Text | A styled string — font, size, bold/italic/underline, color, stroke, shadow. |
| Image | A local image file or URL (logos, frames, badges). |
| URL | A live web page rendered in place. |
| Plugin | An HTML plugin overlay — animated, parameter-driven. See §14. |
Positioning & behavior
| Control | Purpose |
|---|---|
| Position / Size | Place and scale the overlay on the frame. |
| Opacity | Blend it with the video. |
| Layer: Front / Behind | Front draws over you; Behind draws between your background and you — the app turns on person segmentation and re-draws you on top. |
| Show on slot | “Always,” or only when a specific source is on Program. |
| TTL | Auto-hide after N seconds (0 = stays until you remove it). |
Export & import
The panel’s Export / Import buttons save your whole overlay set (including image data) as one file you can move between machines or share.
10Layouts — full scenes in HTML
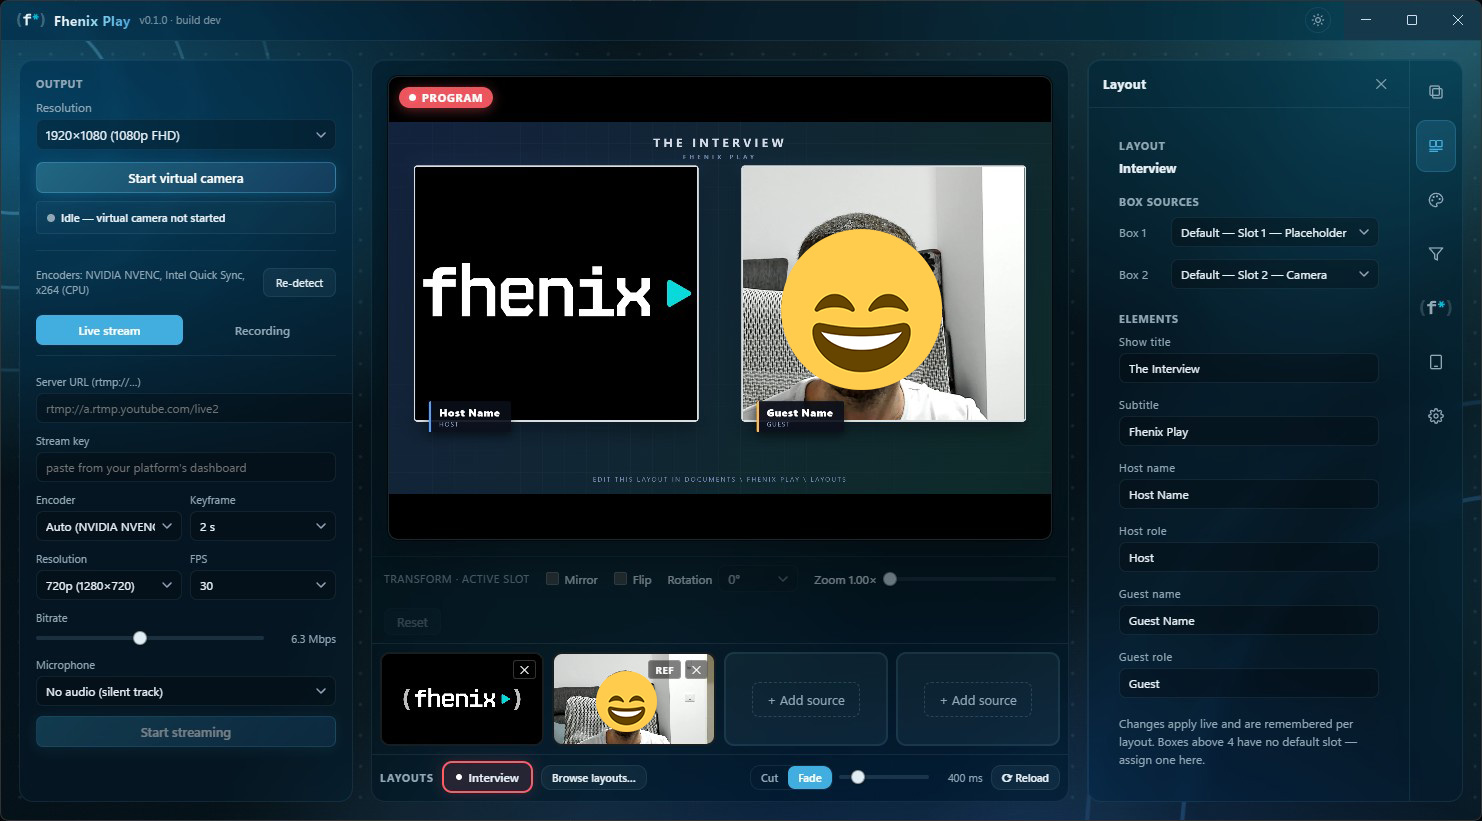
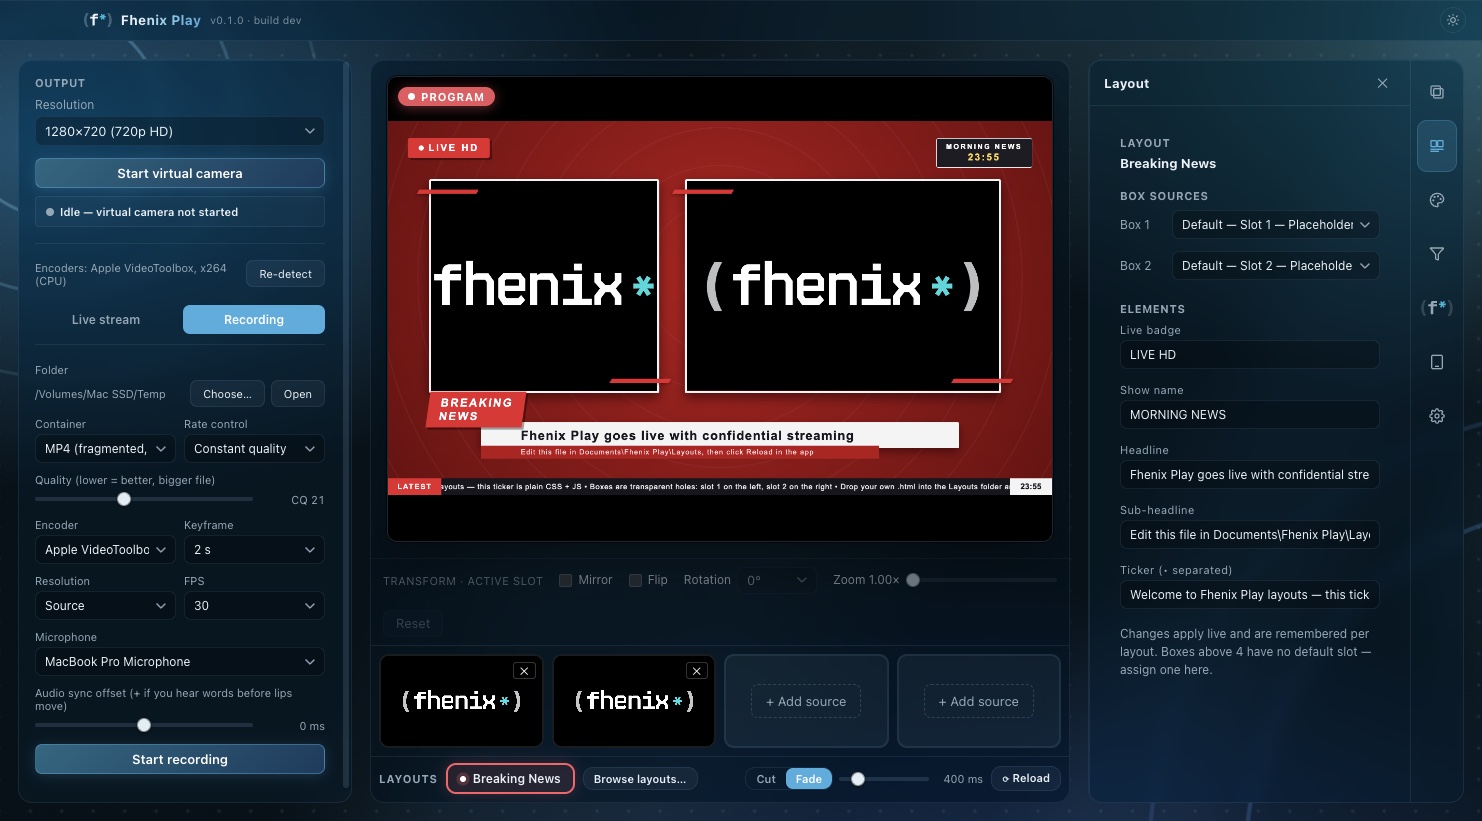
A layout is a full-screen scene that takes over the whole Program: a breaking-news frame, an interview split, picture-in-picture. Layouts are plain HTML pages with transparent boxes where live video shows through — each box maps to one of your preview slots. Anyone who can write a web page can design a broadcast.
Taking a layout
The Layouts strip sits under the preview slots:
- Browse layouts… opens the picker with previews of every installed layout. Bundled scenes: Breaking News, Interview, Presentation + Cam, Presentation + Round Cam.
- Your selected layout stays parked as a chip in the strip even after a source takes over Program — click the chip to bring it straight back. Live = red chip with a dot.
- The Cut / Fade control with its duration slider sets the take transition — it applies to every take, slots and layouts alike.
- Reload re-reads the layout file from disk — the authoring loop while you edit its HTML.
The Layout panel — boxes & live text
With a layout on Program, open the Layout dock panel to control it at runtime:
- Box sources — box N shows slot N by default; remap any box to a different slot or to no source. Per-layout, persisted, re-applied automatically on the next take.
- Elements — the layout’s text fields (live badge, show name, headline, sub-headline, ticker…) as live editors. Changes are pushed into the running page instantly, without touching the HTML file.
Create your own — a working example
A layout is a normal web page — CSS animations, web fonts, JavaScript,
fetch() all work — plus a handful of data-fhx-* attributes
the app reads. Drop a top-level .html file into
Documents / Fhenix Play / Layouts (or a folder with an
index.html plus its own assets), open Browse layouts…,
and it’s there — the picker rescans the folder every time it opens. The tile’s name
comes from the page’s <title>.
On first run the app seeds that folder with the four bundled scenes and a
LAYOUT-GUIDE.md — they’re editable copies, yours to dissect (the app
never overwrites your changes). Here is a complete two-camera scene with an editable
headline and name plates:
<!doctype html>
<html><head><meta charset="utf-8"/>
<title>Side by Side</title>   <!-- the name shown in the picker -->
<style>
  html, body { margin:0; width:100vw; height:100vh;
               background:transparent; overflow:hidden; }  /* video shows THROUGH the page */
  .bg   { position:absolute; inset:0; background:linear-gradient(160deg,#0c1222,#14263a); }
  .cam  { position:absolute; top:16vh; width:42vw; height:60vh;
          background:transparent;                    /* boxes must stay transparent */
          border:0.5vh solid #0ad9dc; border-radius:1vh; }
  .plate{ position:absolute; left:0; bottom:-5vh; padding:0.9vh 1.8vh;
          background:#0ad9dc; color:#001623; font:600 2.6vh/1 system-ui,sans-serif; }
  .headline { position:absolute; left:0; right:0; top:4vh; text-align:center;
              color:#fff; font:700 5vh/1.2 system-ui,sans-serif;
              text-shadow:0 0.4vh 1.2vh rgba(0,0,0,.55); }
</style></head><body>

  <!-- full-bleed background: on its OWN element, marked as backdrop —
       the app punches transparent holes into it wherever the boxes are -->
  <div class="bg" data-fhx-backdrop></div>

  <!-- editable from the Layout panel; this text is the default -->
  <div class="headline" data-fhx-text="headline" data-fhx-label="Headline">Tonight’s show</div>

  <!-- video boxes: the NUMBER binds the box to that preview slot -->
  <div class="cam" style="left:4vw"  data-fhx-box="1">
    <div class="plate" data-fhx-text="name-left" data-fhx-label="Left name">Host</div>
  </div>
  <div class="cam" style="right:4vw" data-fhx-box="2">
    <div class="plate" data-fhx-text="name-right" data-fhx-label="Right name">Guest</div>
  </div>

</body></html>
Save, take it from Browse layouts…, and cameras from slots 1 and 2 appear in the two frames. The headline and both name plates show up as text fields in the Layout panel — no JavaScript needed. From here the loop is: edit the file → ⟳ Reload in the strip → Program updates in place.
Attribute reference
| Attribute | Meaning |
|---|---|
data-fhx-box="N" | Marks the element as a video box bound to preview slot N (1–4). The video renders underneath the page, so the element — and everything covering it, including <body> — must have background: transparent. Borders, corner accents, and children (like the name plates above) composite on top of the video. An empty slot leaves your page’s own styling visible, so give boxes a styled backdrop or border. |
data-fhx-backdrop | Put full-bleed backgrounds on their own element with this attribute instead of on <body> — the app automatically punches transparent holes into it wherever the boxes are, and the holes track boxes that move or resize. Avoid overlapping two boxes over the same backdrop. |
data-fhx-fit | How video fills the box: cover (default — fill, cropping the excess) or contain (letterbox so nothing is cropped — right for screen shares and slides). |
data-fhx-shape="circle" | Clips the video to the ellipse inscribed in the box — a true circle when the box is square (size both axes in the same unit, e.g. 26vh). Draw the ring frame yourself with border-radius: 50%; backdrop holes become circular automatically. See pip-circle.html. |
data-fhx-text="name" | Makes the element’s text an editable field in the Layout panel. The element’s own text is the default; panel edits are applied to the running page instantly (the app sets its textContent), remembered per layout, and re-applied on the next take and after Reload. |
data-fhx-label | The friendly name the panel shows for that field (falls back to the data-fhx-text name). |
data-fhx-box value must be a
number ≥ 1; if two elements claim the same number, the first in the document wins.
Box positions are measured live (CSS transforms included), so a box can move
or resize with an animation and the video follows within about half a second. The
slot’s own settings — mirror/rotate/zoom, color grade, color match — still apply
inside the box; single-source vision filters (background blur, face pixelate,
auto-frame) don’t run inside layout boxes.
Parameters from JavaScript — window.fhenixLayout
For plain on-screen text you never touch JS — the host writes panel edits straight into the tagged elements. The API exists for JS-driven content: tickers, charts, anything that must rebuild when a parameter changes.
interface FhenixLayout {
  readonly apiVersion: 1;
  /** Current panel overrides, keyed by data-fhx-text name. */
  readonly params: Readonly<Record<string, string>>;
  /** Subscribe to panel edits. Returns an unsubscribe fn. */
  onParamChange(cb: (params: Readonly<Record<string, string>>) => void): () => void;
}
To expose a parameter that isn’t literal on-screen text (a ticker’s source string, a chart symbol), park it on a hidden element — it still becomes a panel field:
<!-- a panel field with no visible element of its own -->
<span data-fhx-text="ticker" data-fhx-label="Ticker (• separated)"
      style="display:none">Welcome to the show • Stay tuned</span>

<script>
  const api = window.fhenixLayout;
  function apply(p) {
    if (p.ticker !== undefined) rebuildTicker(p.ticker.split("•"));
  }
  apply(api.params);          // saved overrides, if any
  api.onParamChange(apply);   // live edits from the Layout panel
</script>
This is exactly how breaking-news.html feeds its ticker — read it for the full pattern.
Design size, animation & performance
- Design at 1920×1080 and use
vw/vh/%units. The page renders at the actual program resolution, and viewport units keep everything proportional. Avoid fixedpxfor anything that must scale. - Keep continuous animations localized. The app captures only what changed each frame, but as one merged rectangle — a ticker strip along the bottom costs ~2–5% of the frame, while a pulsing dot top-left plus a ticker bottom-right unions into a near-full-screen repaint 30×/s.
- Use discrete timing for slow ambience.
step-end/steps(n)easing repaints only when the value jumps — breaking-news.html blinks its LIVE dot at 2 repaints/s instead of 30; interview.html drifts its full-screen gradient in 48 steps. A smoothly-easing full-screen animation is the single most expensive thing a layout can do.
External data
fetch() works from layouts (see the ETH price widget in
pip-presentation.html). The page’s origin is fhenix-layout://local,
so APIs that send Access-Control-Allow-Origin: * work as-is, and the app
CORS-unlocks a short allowlist of popular data APIs (e.g. CoinGecko). Always wrap
fetches in try/catch and keep a fallback value — a network hiccup on
stage should degrade gracefully, never blank your scene.
When something’s off
- A box shows my page background, not video — that slot is empty (put a source in it), or the box/an element above it isn’t transparent.
- A box isn’t detected — the
data-fhx-boxvalue must be a number ≥ 1 on a visible element; duplicate numbers are ignored (first in the document wins). - The layout tile shows ⚠ — the page failed to load or crashed; hover the tile for the error, fix the HTML, then Reload or re-take.
- Fonts or images missing — use relative paths next to your HTML (put the layout in its own folder with
index.html+ assets) or data: URIs; remote webfonts load fine when the network is up.
11Outputs — virtual camera, stream, record
Everything you compose goes out through up to three outputs at once, all fed by the same Program frame: the system virtual camera, an RTMP live stream, and a local recording. Each starts and stops independently.
The virtual camera
Click Start virtual camera in the Output column. The status line shows:
| Status | Meaning |
|---|---|
| Idle | Not started. |
| Starting… | Bringing the device up. On macOS, if approval is pending you’ll see buttons to open System Settings and retry. |
| Live | Broadcasting at the chosen resolution and frame rate. |
| Error | Shows a code/message — most often the macOS extension still needs approval. |
With the camera live, pick Fhenix Play in your app:
Live stream (RTMP) & recording
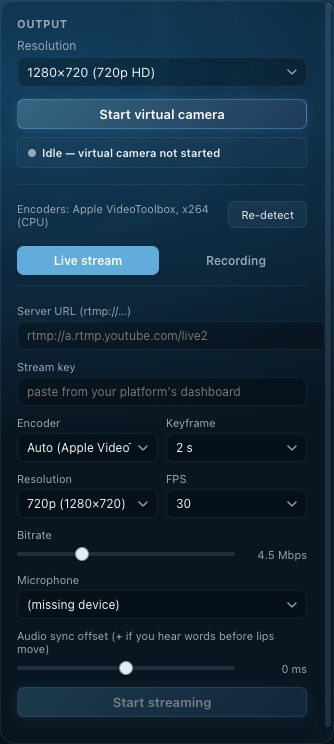
Streaming
Server URL + stream key
Paste your platform’s ingest URL (
rtmp://…) and stream key. The key is stored in the OS keychain, write-only — it never appears in config files or logs, and the field only ever shows that a key is saved.Pick encoder & quality
Auto selects the best hardware encoder found on your machine — NVIDIA NVENC, Intel Quick Sync, AMD AMF, or Apple VideoToolbox — with x264 (CPU) as the fallback. Set resolution (source / 1080p / 720p / 480p), FPS, bitrate, and keyframe interval (2 s is what most platforms ask for).
Audio
Choose the microphone to send, and use Audio sync offset if your voice leads or trails your lips (+ if you hear words before lips move).
Start streaming
The status line shows the live timer, encoder fps, bitrate, and any dropped frames.
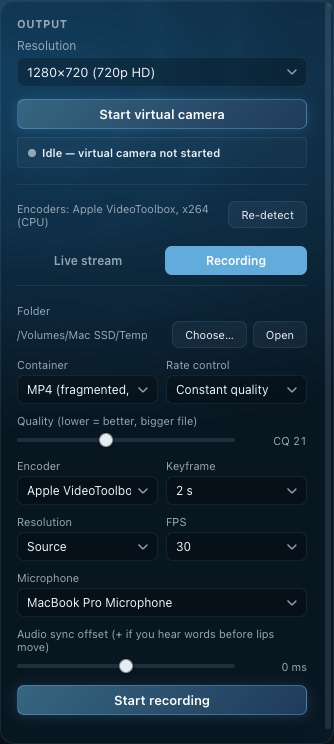
Recording
- Folder — where files land (Open jumps to it).
- Container — MP4 (fragmented), which survives a crash mid-recording, or MKV.
- Rate control — Constant quality (CQ slider — lower = better, bigger file) or a fixed bitrate; plus the same encoder/resolution/fps/microphone choices as streaming.
12iPad & iPhone companion
Fhenix Play Companion turns an iPad into your control room — and an iPhone into a pocket monitor and wireless camera. It pairs over your local network; nothing routes through a server.
- Live Program monitor plus a four-slot multiview, in real time
- Take any slot or layout to Program with a tap — cut or fade
- The iPad or iPhone camera becomes a wireless source on stage
- Telestration: draw over the live Program with Apple Pencil — freehand, arrows, and shapes
- Moderate confidential tips before they hit the stream
Enable the companion on the desktop
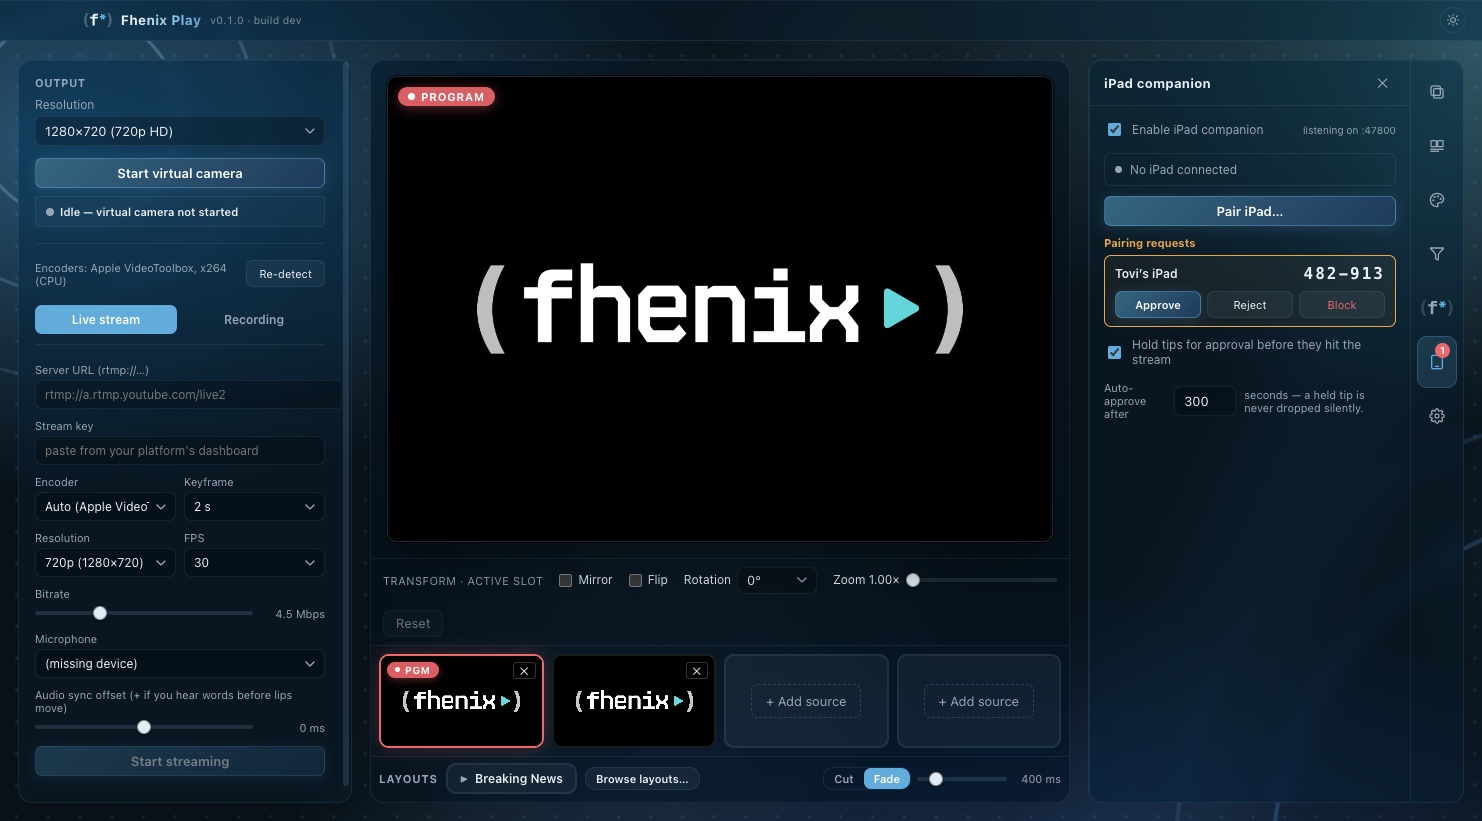
Open the iPad companion dock panel (tablet icon in the rail) and tick Enable iPad companion. The desktop starts listening on your LAN (port 47800 by default) and advertises itself over Bonjour so devices can find it by name.
Pairing — two ways
Scan the QR code
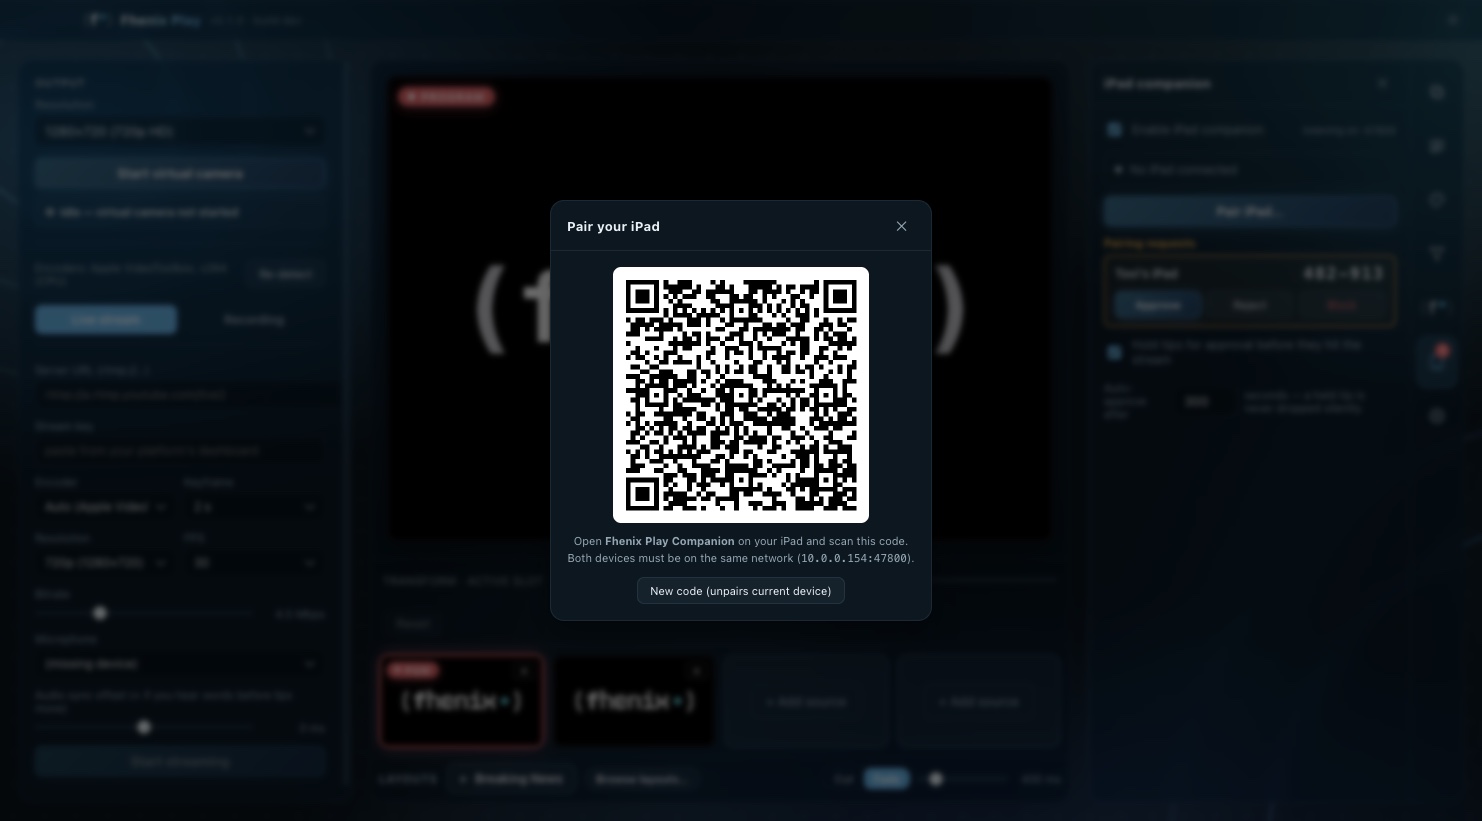
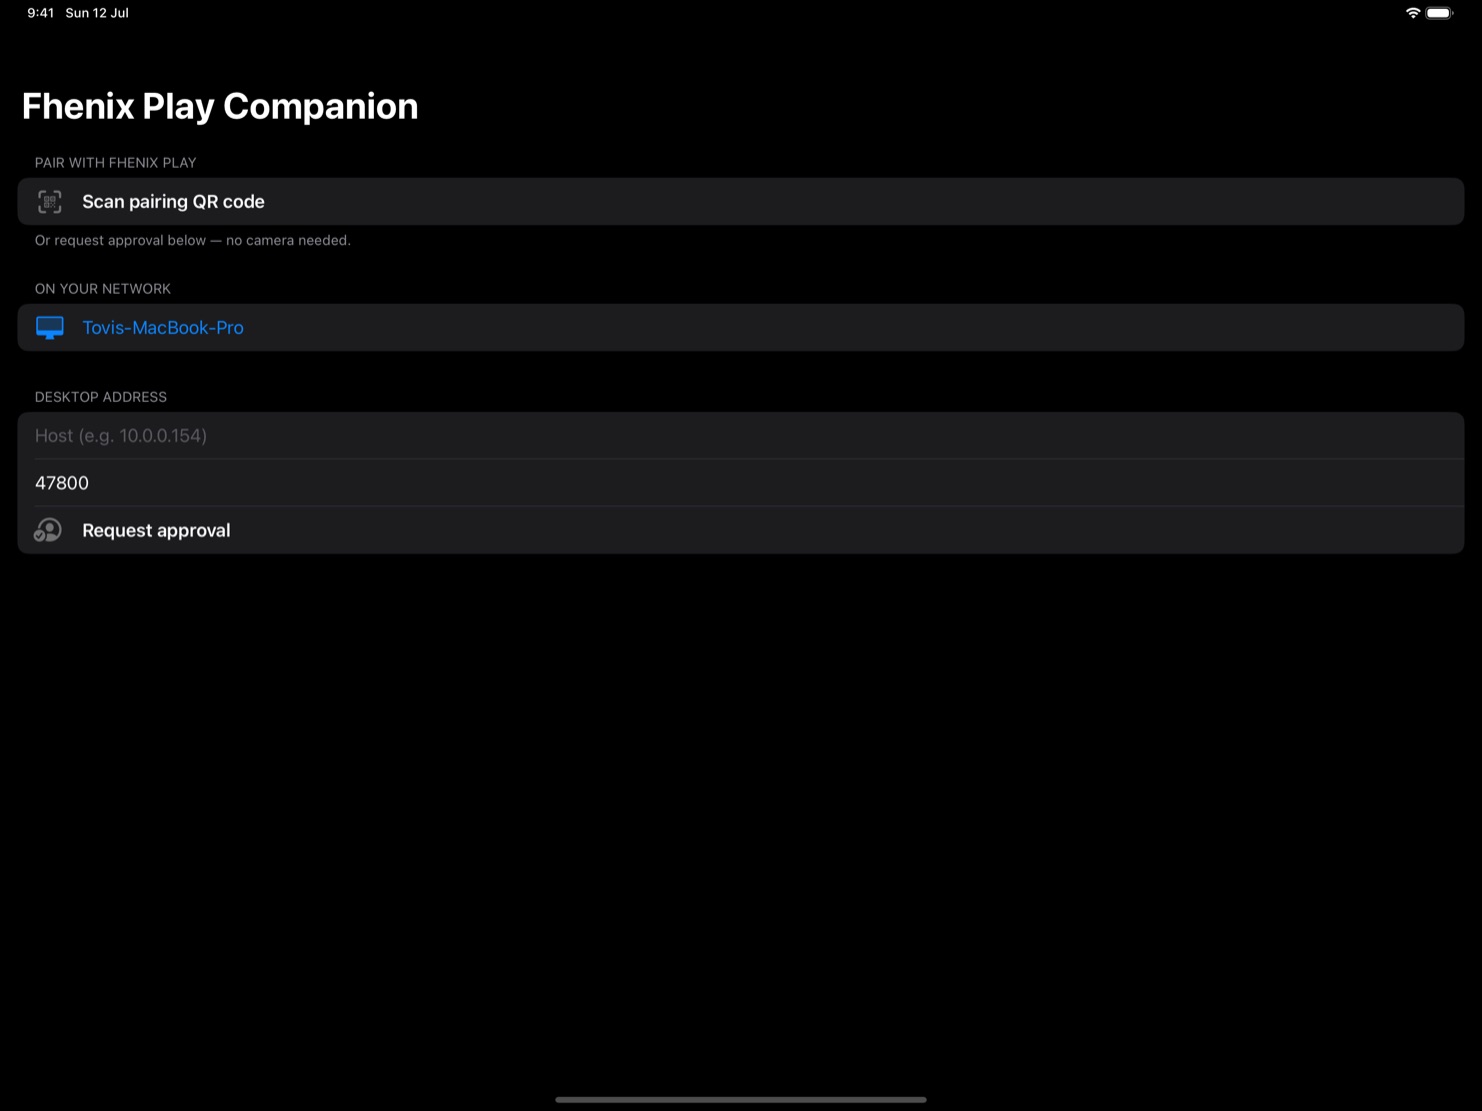
On the desktop click Pair iPad…; on the device choose Scan pairing QR code and point the camera at the screen. Done — the QR carries host, port, and a secret pairing token.
Request approval
No camera needed. The device lists desktops it found on the network; pick yours and it shows a 6-digit code. The same code appears in the desktop’s companion panel — compare, then Approve.
Monitor & switch
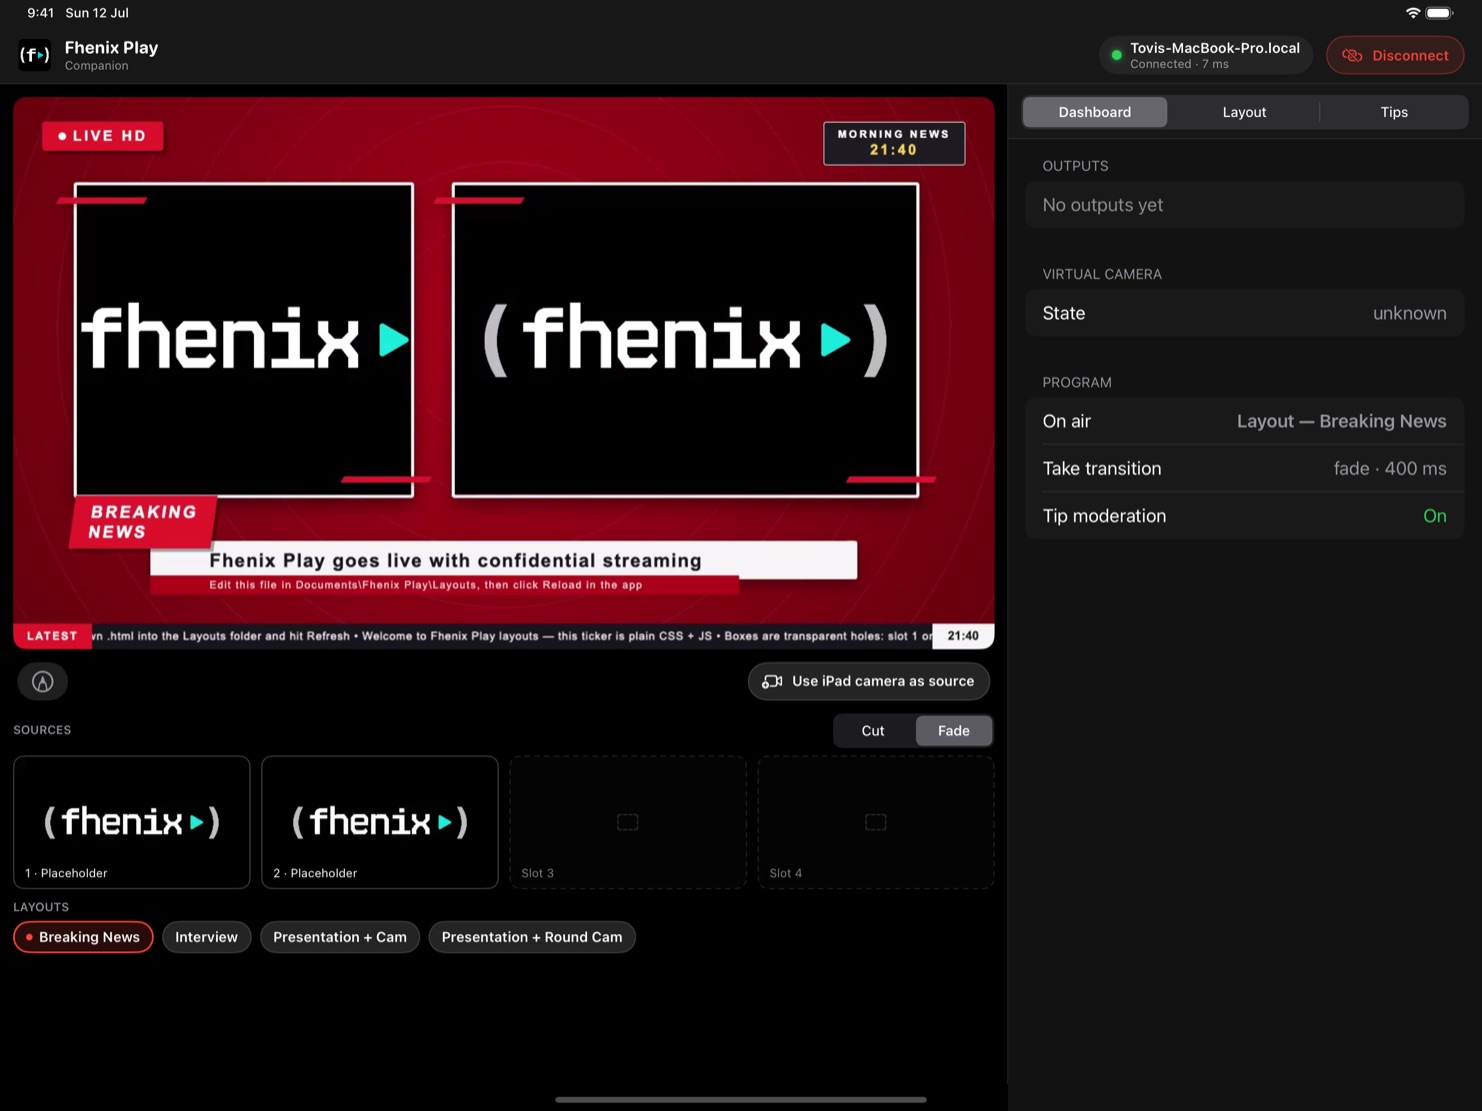
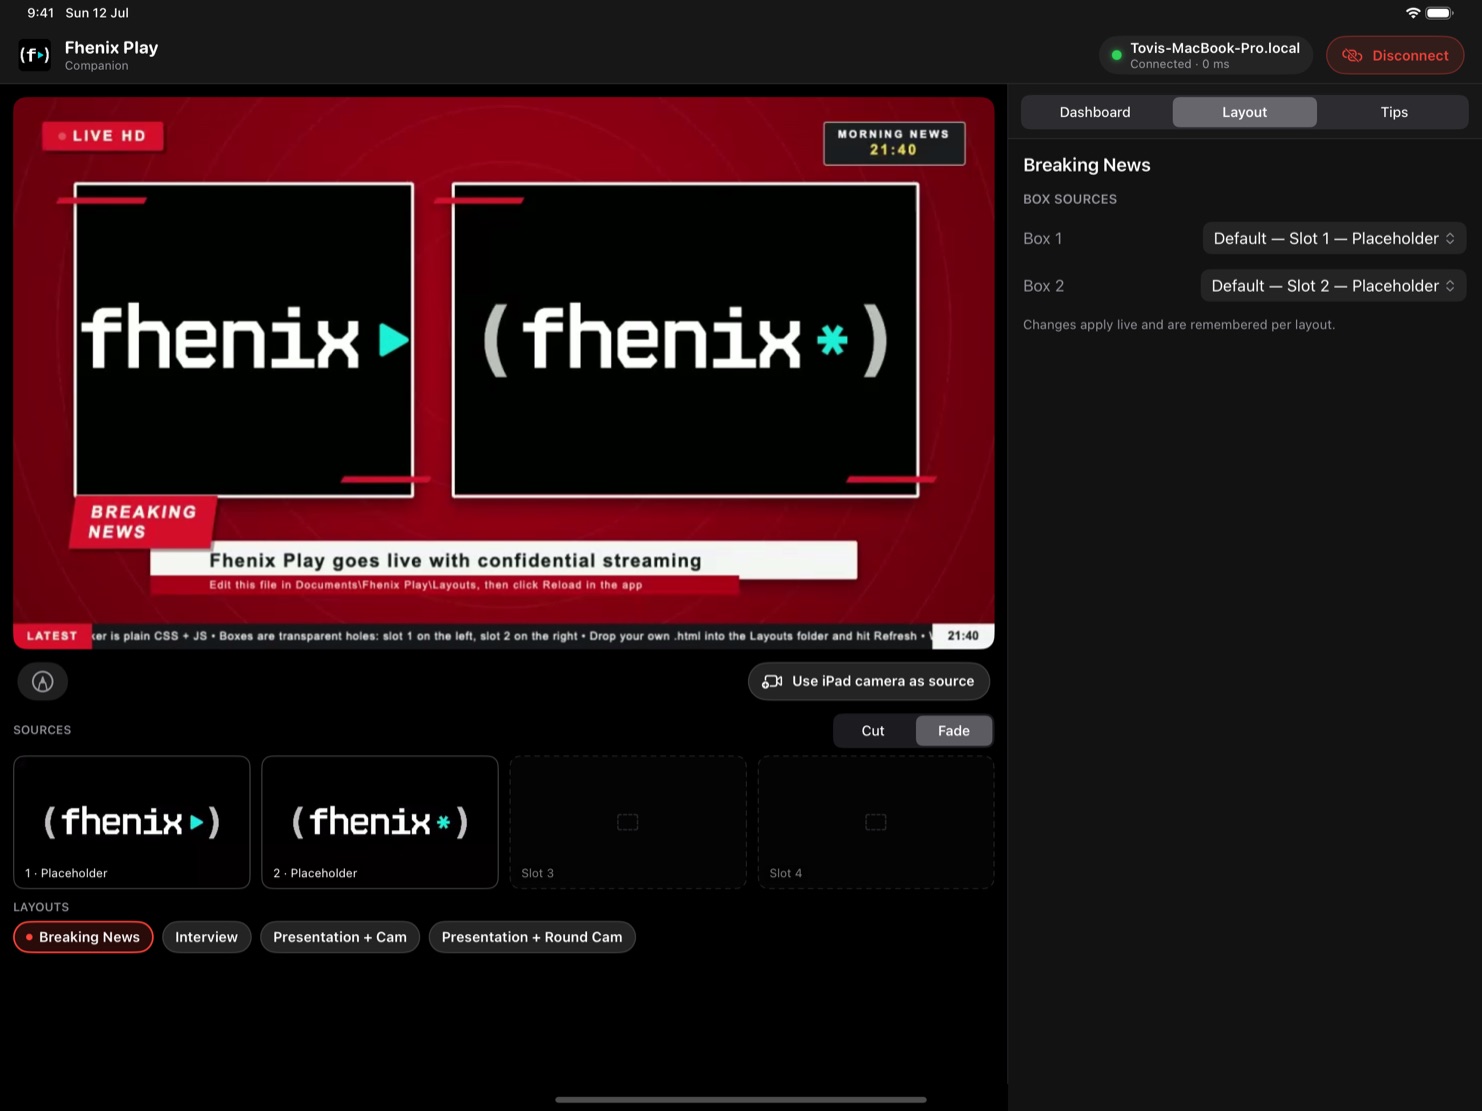
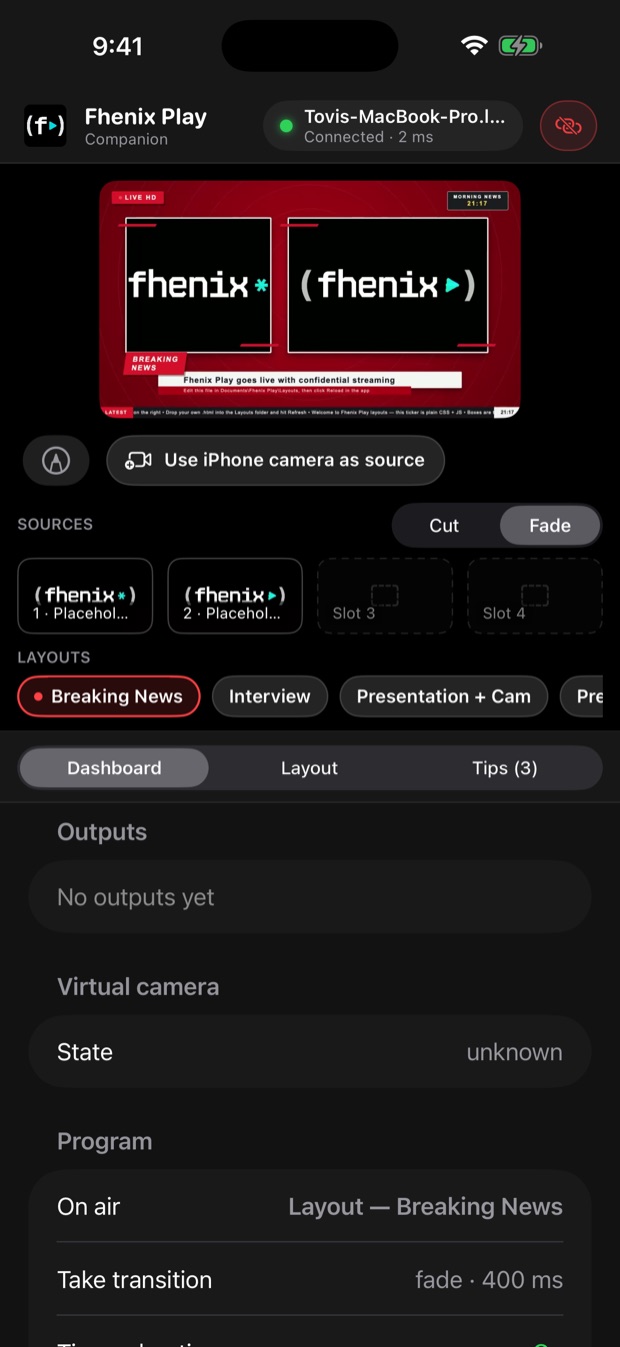
- Program monitor — the live Program, streamed to the device with sub-second latency. The header shows the desktop’s name and connection health (round-trip time), plus the Disconnect control.
- Sources multiview — all four slots as live tiles (not stills). Tap one to take it; the Cut / Fade picker sets the transition; the on-air tile is tallied red.
- Layout chips — every installed layout, right under the sources. Tap to take a layout; the live one shows red with a dot. The Layout tab remaps its box sources, exactly like the desktop panel.
- Dashboard tab — show health at a glance: recording/streaming state with live timers, fps, bitrate, dropped frames, virtual-camera state, what’s on air, the take transition, and tip moderation state.
Use the device camera as a source
Start publishing
Tap the camera button in the toolbar and choose Use back camera or Use front camera (iOS asks for camera permission the first time). Switch between them or stop from the same menu, live.
Add it as a source
On the desktop, the picker now offers your device under Companion camera. Drop it into any slot.
Take it
It behaves like any other source — transitions, transforms, color, filters, layout boxes all apply. Walk anywhere your Wi-Fi reaches.
Telestration — draw on the broadcast
Enable the pencil in the toolbar and draw directly over the live Program with Apple Pencil or a finger. Strokes are composited into the actual Program output — the virtual camera, the stream, and the recording all show them — and fade out on their own a moment later.
| Tool | What it draws |
|---|---|
| Pen | Freehand ink, pressure-sized with Apple Pencil. |
| Line | A straight line from touch-down to release. |
| Arrow | A line with an arrowhead — the classic analyst’s pointer. |
| Rectangle | Box an area of the frame. |
| Ellipse | Circle a player, a chart, a bug. |
A color palette and a Clear button round out the kit. Drawing is buttery on-device (the local echo renders immediately) while the strokes stream to the desktop in real time.
Moderate tips from the couch
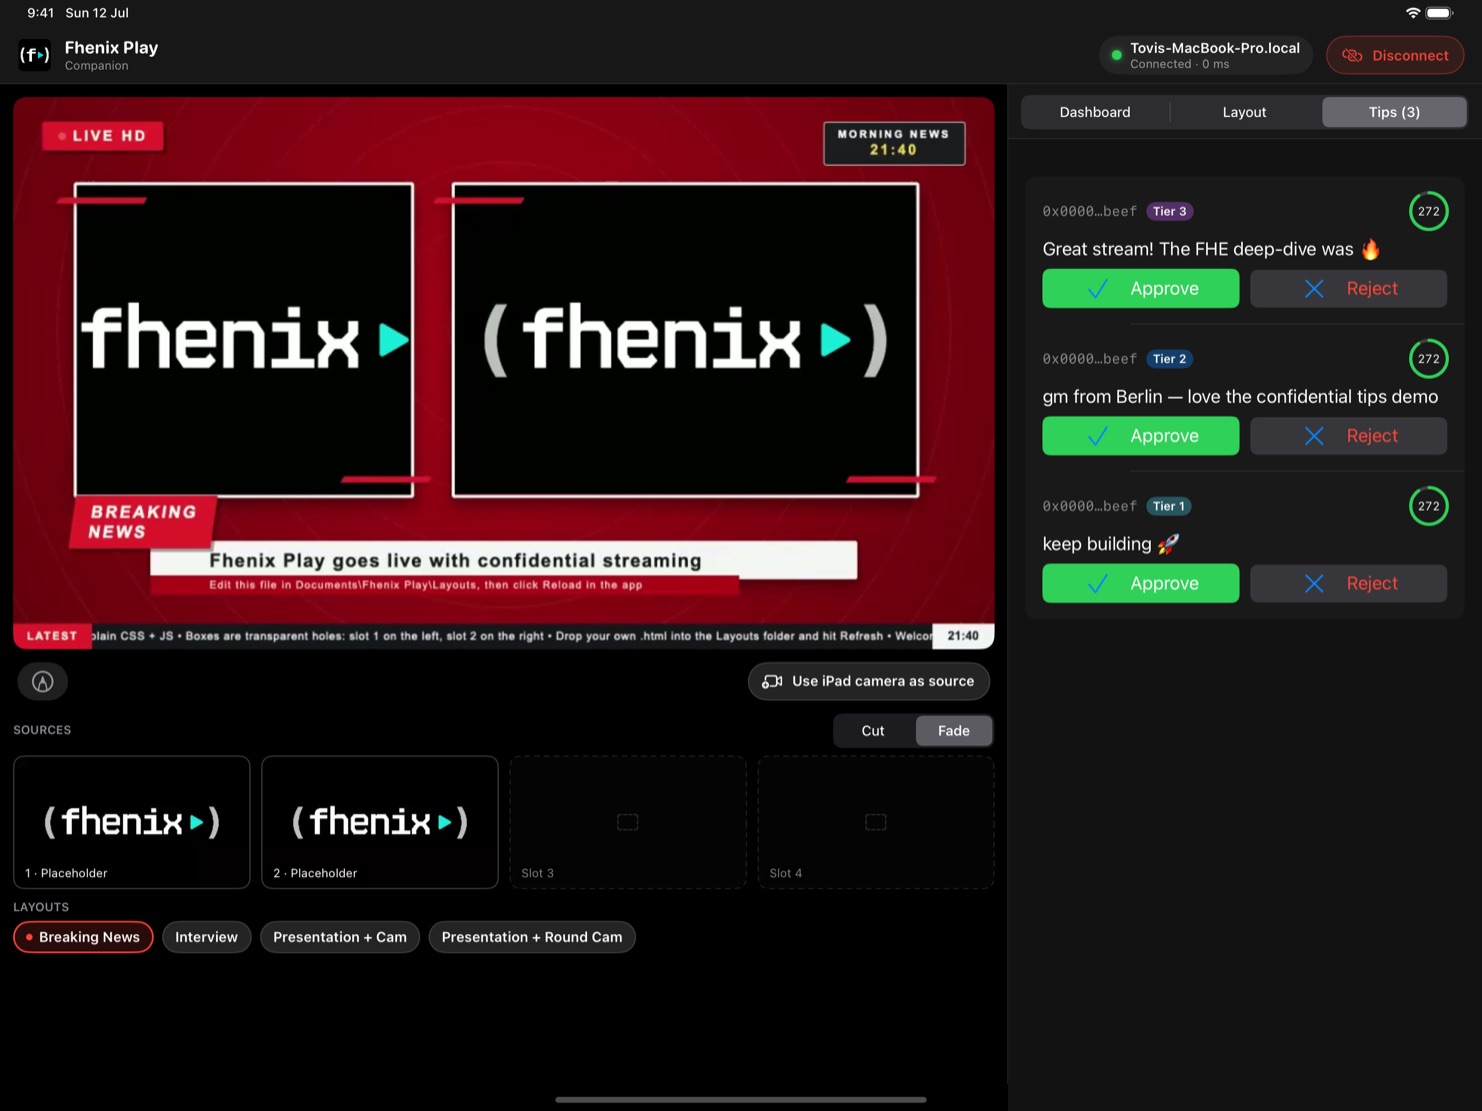
With “Hold tips for approval before they hit the stream” enabled in the desktop companion panel, incoming super-chat tips queue up in the device’s Tips tab (the tab shows a count badge). Each card shows the tier, message, and a countdown ring — Approve puts it on stream, Reject drops it, and if the timer runs out it auto-approves (configurable seconds; a held tip is never dropped silently, even if the device goes offline).
13Confidential interactions
Fhenix Play lets your audience put money where their attention is — through smart contracts computing on fully homomorphic encryption (Fhenix CoFHE). A bid arrives as amount: ▓▓▓▓▓▓ and stays that way on-chain: rivals can’t see it, bots can’t front-run it, and the contract still picks the winner. Everything lives in the Blockchain dock panel.
Connect a wallet
| Wallet | How it signs |
|---|---|
| Local key | A private key generated or imported on this machine — stored OS-encrypted in the keychain, never in files or logs. |
| WalletConnect | Pair a mobile wallet by QR; signing happens on your phone. |
| Fhenix Pay | Pair via the Fhenix Pay app; your phone signs. |
Pick the network and, if needed, a custom RPC at the top of the panel.
The Interaction Studio
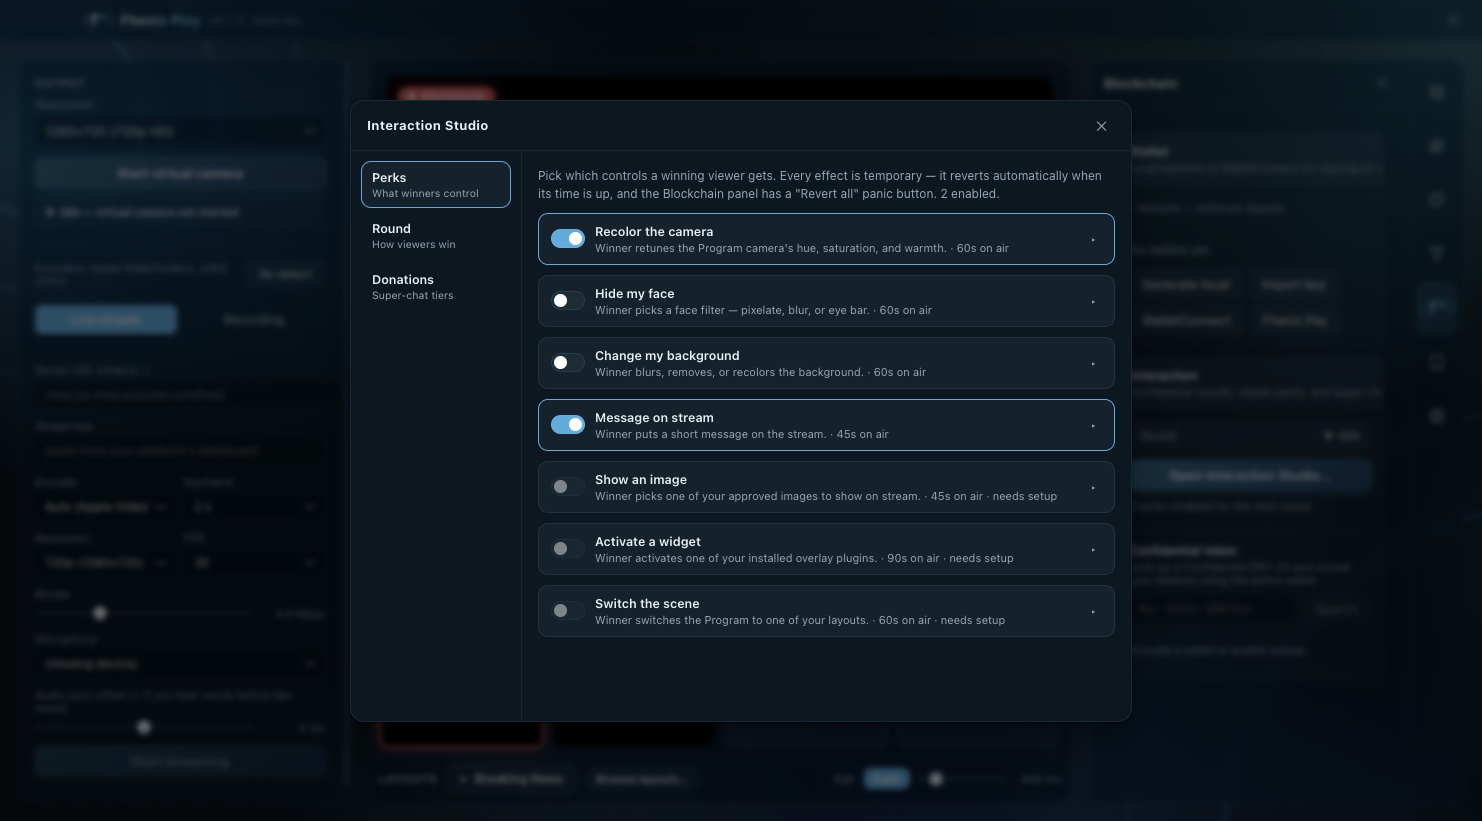
Click Open Interaction Studio… in the Blockchain panel to configure everything in one window, across three tabs:
| Tab | What you set up |
|---|---|
| Perks | What a winning viewer gets to control: recolor your camera, hide your face, change your background, put a message on stream, show an approved image, activate an overlay plugin, or switch the scene to one of your layouts. Every effect is temporary — each has an on-air duration, and a “Revert all” panic button lives in the panel. |
| Round | How viewers win: pick a mode (below), set its numbers, and start the round with your enabled perk catalog attached. |
| Donations | Super-chat tiers: the tier thresholds are public; what each viewer actually pays never is. |
The three round modes
Sealed-bid auction
Highest encrypted bid over the round wins. No one sees rival bids; the leader is revealed only at settlement.
Closest to goal
You set a hidden target amount; the bid that lands closest wins. Every guess stays encrypted until the round settles.
Pay to interact
Anyone clearing a minimum gets the perk. Amounts stay private; no deadline.
Confidential by construction
In every mode, amounts stay encrypted during the round — decryption happens only at settlement, on the threshold network.
Running a round
Configure & start
Pick the mode in the Studio’s Round tab, fill in its fields, and start the interaction.
Audience joins by QR
A QR code appears on the Program output. Viewers scan it to open the join page and submit encrypted bids.
Settlement
When the deadline passes (or you stop the round), it finalizes, decrypts on the threshold network, and the winner’s perk goes live — automatically reverting when its time is up.
Confidential super-chat
Viewers tip with a message; only the tier they cleared is revealed on stream — never the amount. The Tips feed in the Blockchain panel keeps the running list (count, per-tier breakdown, every message) with a status dot showing the on-chain watcher, so you can confirm a donation arrived even when the overlay isn’t showing. Pair it with companion moderation to approve each tip before it hits the stream.
Settings: contracts, permits, diagnostics
- Network & contracts — factory address, confidential-token address, relay URL, with one-click restore-defaults.
- Permits — create and select the EIP-712 permit that authorizes the threshold network to decrypt results for your wallet. “Permit not found” errors mean you create one here first.
- Diagnostics — a live, color-coded log of chain/relay/round activity.
14Creating plugins
A plugin is a small HTML/CSS/JS bundle that Fhenix Play renders on an invisible, offscreen page and composites over your video as an overlay. No framework, no build step — just web code and a tiny host API.
The mental model
Each active plugin overlay is one offscreen browser page. It paints whatever you draw
(DOM, Canvas, WebGL, SVG, CSS animation); the host captures each painted frame and
draws it over the Program at the position and size you set in the Overlays panel.
Your plugin can’t see the video behind it — effects that need the underlying
scene (like frosted glass) are done by the host (see blurBehind).
Your first plugin
Create a folder named hello-world in your plugins directory (find it via Overlays → + Plugin → Open folder). Put two files in it:
{
  "id": "hello-world",
  "name": "Hello World",
  "version": "1.0.0",
  "apiVersion": 1,
  "entry": "index.html",
  "defaultWidth": 480,
  "defaultHeight": 80,
  "params": [
    { "name": "text", "type": "string", "label": "Text", "default": "Hello, world" }
  ]
}<!doctype html>
<html><head><meta charset="utf-8"/><style>
html,body { margin:0; background:transparent; }
body { display:flex; align-items:center; justify-content:center;
width:100vw; height:100vh; color:#fff;
font:600 28px/1 system-ui, sans-serif;
text-shadow:0 2px 6px rgba(0,0,0,.6); }
</style></head><body>
<div id="t"></div>
<script>
const api = window.fhenixPlugin;
const el = document.getElementById("t");
function render(p) { el.textContent = p.text ?? ""; }
render(api.params);
api.onParamChange(render);
requestAnimationFrame(() => api.signalReady());
</script>
</body></html>Then in the app: Overlays → + Plugin → Refresh → click Add next to “Hello World.” Edit the Text field and watch it update live.
Bundled examples to learn from
| Plugin | Teaches |
|---|---|
| glass-lower-third | Param-driven CSS, fade via a visible boolean, frosted glass with blurBehind. |
| crypto-ticker | Network fetch(), deferred updates with commit:"button", many params. |
| behind-orbit | Canvas animation and the Behind layering trick. |
Installing & sharing
A plugin is just a folder. To install one, drop it into the plugins directory and click Refresh. To share, zip the folder and send it.
| Platform | Plugins folder |
|---|---|
| Windows | %APPDATA%\Fhenix Play\plugins\ |
| macOS | ~/Library/Application Support/Fhenix Play/plugins/ |
15Plugin API reference
The complete contract: the manifest, parameter controls, the runtime API, host effects, and the sandbox.
15.1 — plugin.json manifest
Every plugin folder needs a plugin.json at its root. An invalid manifest causes the plugin to be skipped and counted in the picker’s error badge.
| Field | Type | Description |
|---|---|---|
idreq | string | Stable identifier; must match the folder name. Lowercase, filesystem-safe ([a-z0-9._-]). |
namereq | string | Display name in the picker and overlay row. |
versionreq | string | Semver. Surfaced only. |
apiVersionreq | number | Host contract version. 1 for basic plugins; 2 to use the vision API. A plugin requesting a version newer than the host is refused. |
entryreq | string | HTML file to load, relative to the folder (e.g. index.html). |
description | string | Shown under the name in the editor. |
captureFps | number 1–60 | Paint-capture cap. Default 30 (the host throttles to its own rate anyway). |
defaultWidth | number | Initial offscreen width in px (resizable later). Default 640. |
defaultHeight | number | Initial offscreen height in px. Default 120. |
blurBehind | number 0–64 | Frosted-glass blur radius applied to the video behind the overlay (see 15.4). |
wantsVision | boolean | With apiVersion ≥ 2, opt in to per-frame mask/face/pose/gesture data (see 15.6). |
params | array | Editable parameters (see 15.2). |
author / homepage | string / URL | Optional credits shown in plugin info. |
15.2 — Parameters & controls
Each entry in params renders an input in the overlay editor. Every param has a name (the key in params), a type, an optional label, and usually a default.
| Type | Options | Renders as |
|---|---|---|
string | multiline:true for a textarea; commit:"button" to apply on Enter/Apply instead of each keystroke (use for expensive work like fetches). | Text field / textarea |
number | min, max, step; control:"slider" (needs min+max) for a range slider. | Number input or slider |
boolean | — | Checkbox |
color | Default as #RRGGBB (any CSS color works at runtime). | Color swatch + picker |
enum | options:["a","b",…] (required); default must be one of them. | Dropdown |
visible
also gets Play ▶ / Stop ⏹ buttons on the overlay row, for quick
show/hide. Your plugin decides what visible does (typically a CSS fade).
15.3 — Runtime API: window.fhenixPlugin
The host injects exactly one global. Nothing else of the host is reachable.
type Primitive = string | number | boolean;

interface FhenixPlugin {
  /** Current parameter values, keyed by manifest `name`. Read-only. */
  readonly params: Readonly<Record<string, Primitive>>;

  /** Subscribe to live param edits. Returns an unsubscribe fn.
      Each call receives the FULL param set (replace, not merge). */
  onParamChange(cb: (params: Readonly<Record<string, Primitive>>) => void): () => void;

  /** Tell the host your first real frame is ready. Frames before
      this fires are suppressed so no half-styled boot frame ships. */
  signalReady(): void;

  /** apiVersion ≥ 2, only when manifest sets "wantsVision": true. */
  onVisionFrame?(cb: (frame: VisionFrame) => void): () => void;
}| Member | Behavior |
|---|---|
params | Snapshot you read on startup to do your first render. |
onParamChange(cb) | Fires on every edit with the whole param set. Returns an unsubscribe function. A throwing callback won’t break others. |
signalReady() | You must call this, or the host never captures your overlay. Call it after one or two requestAnimationFrame ticks so fonts/layout settle. Idempotent. |
onVisionFrame(cb) | Per-frame vision data for opted-in plugins (15.6). |
Lifecycle
- Host loads your
entryin an offscreen page; the preload exposeswindow.fhenixPlugin. - Your script reads
api.paramsand renders. - You call
api.signalReady(). - The host starts capturing painted frames and compositing them over the video.
- On a param edit, your
onParamChangeruns with the new full set.
15.4 — Frosted glass: blurBehind
CSS backdrop-filter does nothing in a plugin (there’s no video behind your page to blur). Instead declare blurBehind in the manifest and the host blurs the video region under your overlay before drawing your bitmap on top.
{ "blurBehind": 14 } // radius in 1080p-reference pxborder-radius,
clip-path, mask-image and drop-shadows all shape the frosted
region automatically. Author your glass card normally (a semi-transparent fill) —
don’t add backdrop-filter yourself.
15.5 — “Behind me” layering
To place an overlay between your background and you, you don’t need any code — tick the overlay’s Behind box in the Overlays panel. The host turns on person segmentation and re-draws you on top of the overlay. Use onVisionFrame (below) only if you want effects keyed to the actual mask shape.
15.6 — Vision API (apiVersion 2)
Set "apiVersion": 2 and "wantsVision": true, then subscribe to onVisionFrame to receive the live person mask, face boxes, pose landmarks, and recognized gestures for the active source each frame.
api.onVisionFrame(function (frame) {
  // frame.slotId   : string
  // frame.mask?    : { buffer: ArrayBuffer, width, height }  R8 0..255 person mask
  // frame.faces?   : [{ x, y, w, h }]        source-video UV (0..1)
  // frame.pose?    : [{ x, y, z, visibility }]
  // frame.gestures?: [{ name, score, handedness }]
});
The host only sends vision data to plugins that opted in, and only while segmentation is already running (a Behind overlay, the Background filter, or another vision plugin is active).
15.7 — Sandbox & limits
Plugins run in a locked-down, offscreen page with sandbox, contextIsolation, and nodeIntegration:false. They’re served over a private fhenix-plugin://<id>/ scheme.
| Capability | Status |
|---|---|
| HTML/CSS/JS, Canvas, WebGL, SVG, web fonts, CSS animation | ✅ Yes — it’s a full Chromium page. |
Relative files in your plugin folder (./style.css, fetch("./data.json")) | ✅ Yes (same-origin per plugin id). |
Network fetch() | ✅ Subject to CORS; a small host allowlist eases curated APIs (e.g. CoinGecko for the ticker example). |
Node.js, require, filesystem, process | ❌ None. |
| Host internals (wallet, virtual camera, chain, other plugins) | ❌ Only window.fhenixPlugin is exposed. |
| Reading the program video | ❌ Not directly — use blurBehind or the vision API. |
| DevTools on the plugin page | ❌ Author against the same HTML in a normal browser tab to debug. |
Each active plugin overlay is its own renderer process (≈ one browser tab of memory). Captured frames are clamped (long edge ~960 px, ≤24 fps) — fine for an upscaled overlay and easy on the CPU.
16Troubleshooting
The virtual camera doesn’t appear in my meeting app
- Is the status Live? Click Start virtual camera first.
- macOS Approve the extension in System Settings → Privacy & Security, then restart the meeting app.
- Windows Reinstall Fhenix Play, then restart the meeting app — it enumerates cameras at launch.
- Fully quit and reopen the meeting app after starting the camera.
Resolution looks wrong / source cropped in OBS
- Set the output resolution before connecting, then re-add “Fhenix Play” as the source in the app that latched the old size.
The companion app can’t find my desktop
- Both devices must be on the same network (and the same subnet — guest Wi-Fi networks often isolate clients).
- Make sure Enable iPad companion is ticked and the panel says listening.
- On the device, iOS asks for Local Network permission the first time — if you declined, enable it in Settings → Privacy → Local Network.
- Some routers block Bonjour discovery entirely — QR pairing still works, because the code carries the host and port directly.
A pairing request never shows up on the desktop
- Look for the red badge on the tablet icon in the right-hand rail — requests appear inside the companion panel, deliberately not as a popup.
- If the device was previously blocked, unblock it in the panel’s blocklist first.
The slot says “Companion camera is not publishing”
- Publishing is started from the device: camera button → Use back/front camera.
- If the device shows a camera error, iOS camera permission is missing — the alert’s Open Settings button takes you to the right switch.
The companion’s Program monitor is black
- Something must be on Program (a source or layout) — take one on the desktop or from the multiview.
- Check the connection chip in the companion header; if it shows an error, disconnect and reconnect (or re-pair).
Streaming won’t start
- The button stays disabled until both the RTMP URL and a saved stream key are present — the key must be saved once (it’s write-only after that).
- If the microphone dropdown shows (missing device), re-pick your mic — the saved one was unplugged.
A filter is slow or won’t start
- The first use of Background or Captions downloads a model — give it a moment; watch the status line.
- AI filters apply to the source currently on Program; make sure the right tile is live.
My plugin doesn’t show up / renders nothing
- Did you click Refresh after adding the folder? Does the folder name match the manifest
idexactly? Isplugin.jsonvalid JSON? - Did you call
api.signalReady()? Until you do, frames are suppressed. - Open the same HTML in a browser to spot console errors. Re-add the overlay to pick up file edits (the offscreen page caches).
The voice changer has no output device
- Install a virtual audio cable (VB-CABLE on Windows, BlackHole on macOS) — the panel links to one — then pick it as the Output and select it as your mic in the meeting app.
17Appendix
File locations
| What | Windows | macOS |
|---|---|---|
| Plugins | %APPDATA%\Fhenix Play\plugins\ | ~/Library/Application Support/Fhenix Play/plugins/ |
| Custom layouts | Documents\Fhenix Play\Layouts\ | ~/Documents/Fhenix Play/Layouts/ |
| App data (config, wallets, models) | %APPDATA%\Fhenix Play\ | ~/Library/Application Support/Fhenix Play/ |
| Recordings | The folder you chose in the Recording tab (Open jumps to it). | |
At a glance
| Item | Value |
|---|---|
| App name | Fhenix Play |
| Version | 0.1.0 |
| Virtual-camera name (in other apps) | Fhenix Play |
| Desktop platforms | Windows 10/11 · macOS 13+ |
| Companion app | Fhenix Play Companion — iPadOS/iOS 17+, iPhone & iPad |
| Companion transport | LAN only · default port 47800 · Bonjour _fhenixplay._tcp · WebRTC media |
| Stream encoders | NVENC · Quick Sync · AMF · VideoToolbox · x264 |
| Recording containers | MP4 (fragmented) · MKV |
| Plugin API version | 1 (basic) · 2 (vision) |
| Chain | Fhenix CoFHE · Arbitrum Sepolia testnet · ERC-7984 confidential token |
Where to go next
- Pair the companion — §12, five minutes from install to switching scenes off a couch.
- Design a scene — copy a bundled layout (§10) and make it yours in a text editor.
- Make a plugin — follow §14, then the full §15 API reference.
- Run a confidential round — open the Interaction Studio (§13) and let your audience in.